NinoTNC components: Difference between revisions
From TARPN Wiki
No edit summary |
No edit summary |
||
| Line 6: | Line 6: | ||
# Drag-and-drop the BOM file you downloaded (in step 1) to the blue area or click "Browse your files" to select it. This will fill your cart with the right components: | # Drag-and-drop the BOM file you downloaded (in step 1) to the blue area or click "Browse your files" to select it. This will fill your cart with the right components: | ||
[[File:Mouser-upload.png|alt=Screenshot showing the Mouser shopping cart screen where you can upload the BOM|489x489px]] | [[File:Mouser-upload.png|alt=Screenshot showing the Mouser shopping cart screen where you can upload the BOM|489x489px]] | ||
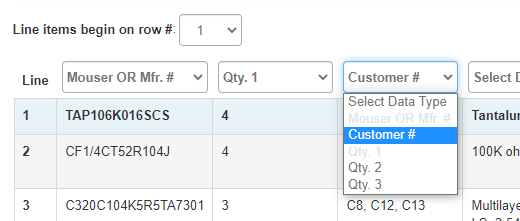
# | #Change the drop-down for the first 3 columns in the table Mouser shows, to match the image below. They should be "Mouser OR Mfr.#", "Qty.1" and "Customer #" (in that order). Don't change any of the other dropdowns. | ||
[[File:Mouser-columns.png|alt=Mouser columns screenshot]] | |||
Revision as of 21:53, 28 April 2023
The TARPN project maintains an up-to-date list or components ("bill of materials" or BOM) to build a NinoTNC. This page describes how to download and use the list to simplify ordering everything you need to build a NinoTNC for your TARPN node.
- Download this BOM file in .xlsx format
- Visit Mouser, and sign in or create an account if you don't already have one
- Click the shopping cart icon in the upper-right
- Drag-and-drop the BOM file you downloaded (in step 1) to the blue area or click "Browse your files" to select it. This will fill your cart with the right components:
- Change the drop-down for the first 3 columns in the table Mouser shows, to match the image below. They should be "Mouser OR Mfr.#", "Qty.1" and "Customer #" (in that order). Don't change any of the other dropdowns.

